TMI Gifts Logo

TMI Gifts Logo

Tuesday, April 22, 2014

Secretary's Day


At work we often turn to a certain person when we have a problem, need assistance and are needing something done. That person also knows the inner workings of the office and keeps it running in tip-top shape. You might call them office managers, secretaries or assistants, there is a special day of the year that honors and recognizes the millions of hard workers who fulfill that need. Take the day to show them how much you appreciate them. Whether it be a heartfelt thank you or a gift that shows your appreciation.


Administrators Professionals’/ Secretary’s Day is April 23, 2014.


Friday, April 18, 2014

How to Make a Wreath

How to make a wreath with a Grapevine form. 


Ok so today lets talk about how to make a wreath with a grapevine form.  This to me is one of the easiest wreaths to make.  I also feel like it is such a simple and rustic look. I personally love this look!

This particular one is more of a Spring/Summer look! 


You will need a grapevine wreath.  The one pictured above is a  24" Grapevine wreath.
You can use which ever size is best for you.  We also carry an 18", 30" and 36" Grapevine wreaths.


The Next step you need to take is to take your Yellow Daisy and either secure with a zip tie or weaving the branches in through the grapevine twigs.  Using a zip tie would be the easiest thing to do.  When you zip tie them on, try to do it about the middle of the stem and to where your bow will cover it. 

Take the ends of the stems and bend them to curl.  Don't over think this part because it really isn't hard and it doesn't have to be any particular way or going any specific direction.  On this wreath there is a flower pointing up and two placed downwards all on the left side of the wreath.


Dry Curly Grass always adds a nice look to anything.  I always think a little greenery can make things look a little more realistic and in this case I think it gives the wreath a little more texture.  The curls just really make it fun! 
Take the bundle of the 24" Light Green Dry Curly Grass and pull it apart.  Take a few twigs and place them throughout the left side of the wreath.  Use it on top and the bottom. Simply secure it by poking in through the grapevine wreath. It is as simple as that.  

Right now you are probably feeling like your wreath isn't looking right.  But don't you worry because it will all come together once you get the rest of your product on there. 

Lets start working on the bow now!

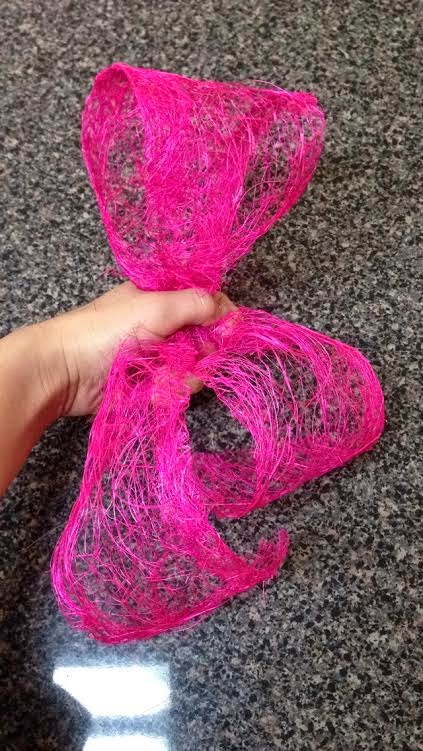
This is a different kind of bow than what we normally do. First take your 4" Natural Jute and cut a strip about 28" to 30" long.  Hold your ribbon 7" from the bottom of one end of the ribbon and make a loop big enough to where you have about 7" hanging from the other end of the ribbon.  You're going to do this with every strip of ribbon and layer it.  I would make your jute the bottom layer, pink banana weave, lime Designer Netting and then layer your printed ribbons on there to what suits you best.  When layering them make sure your loops are all facing a different direction.  You don't want a bunch of loops all going the same direction.  If you did that, you really wouldn't have a bow.   After you are done layering, you then zip tie your bow to the grapevine wreath about the middle on the left side. 


http://shop.tmigifts.com/4-x-10-yds-designer-netting-banana-weave-hot-pink-br40013/dp/4604

http://shop.tmigifts.com/3-x-20-yds-designer-netting-apple-with-lime-glamour-mr81007/dp/135 


http://shop.tmigifts.com/25x-25-yds-poly-wired-striped-dazzle-2-we-90083w-061-40j/dp/7503


Now for the very last thing!  We put a Bottle Cap Owl inside our wreath. All we did was take his little feet and poke them in the grapevine to secure it.  You can also use a zip tie. 

http://shop.tmigifts.com/owl-standing-with-bug-eyes-3-asst-312108/dp/7956


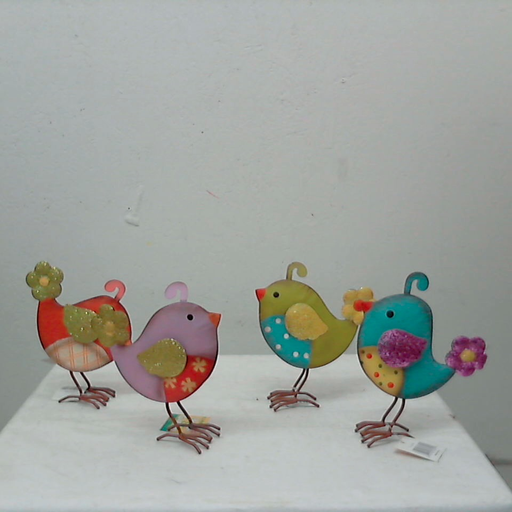
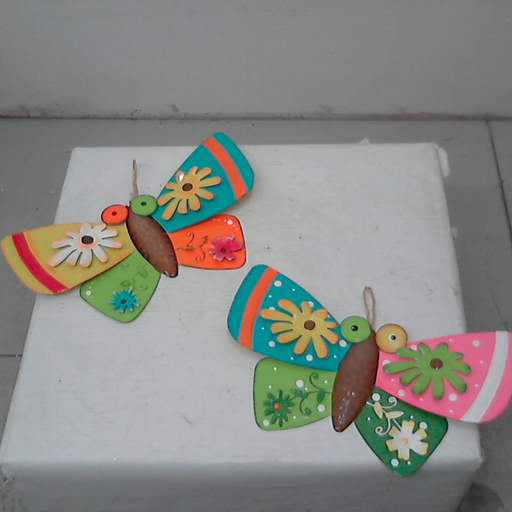
Here are some other suggestions. Just in case you aren't a fan of the Bottle Cap Owl. 

Metal bird with glitter wings 

http://shop.tmigifts.com/metal-bird-with-glitter-wings-9-tall-4-styles-priced-per-each-212150/dp/6740


http://shop.tmigifts.com/wall-decor-metal-spring-butterfly-3d-bright-colors-15-2-styles-priced-per-each-212389/dp/6722


If you have any questions about how this wreath was made or more in depth questions, you can email tiffoni.tmigifts@gmail.com or call 1-800-869-3395 and ask for Robin or Tiffoni.


Monday, April 14, 2014

20" x 10 Yds Chevron Burlap in now in!


20" Burlap in now available!

Chevron is all the rage right now.   It has become so popular that you are seeing it in multiple industries and markets.  It is in fashion, interior designs, architecture, web designs, advertising, packaging, and more.   We have recently introduced our 20” Burlaps in this past year and it has been a huge hit!  Such a big hit that we decided to bring in more bold and beautiful designs.  So here it is!! What so many of you have been waiting for this year!  Get your phones ready and call us while available!


        We use the burlap for a large variety of projects and designs.  Here are some pictures of how we use it! 
 Here we have used our 20" by 16" Wooden Elephant Cut out and the 20" by 10 Yds Houndstooth Burlap.
We also have wooden cut out in 20" Letters and 12" Letters.  This is a real simple little project.  Just use spray adhesive to attach the burlap and then cut off the extra. Note: Use a cardboard or something you don't mind ruining to do this on because the adhesive is very sticky.


Here we used a burlap coffee sack to cover a chair (Directions of earlier posts).  Then just cut a strip of burlap to monogram and attached with bows.  We have the Burlap Coffee Sacks available for only $2.00.

In this picture you can see we have used the Burlap for multiple things.  We have made curtains, a runner, and stocking with it.  You can get so creative burlap.  So many endless things to do with it!  

Tuesday, April 8, 2014

How to make a Mannequin Dress with Designer Netting!


There are several different ways to make a mannequin dress. I am just going to start off explaining how to make "The Sun-Kissed Dress".

I love these mannequin dresses because it is such a great display for a store front and party decor.  We even made a bride and groom out of these at one point.  Maybe I can find the picture to post so that you can see how that was done.  We have had people buy our clown mannequin, bride mannequin and the mannequin dresses.  You can really get creative with a mannequin form and a few rolls of Designer Netting, 


"The Sun-Kissed Dress" 

Our Designer, Robin Parrish did a wonderful job designing this dress.  I fell in love with it when I saw it. I immediately told her that I had to get a picture and do a blog on how to do this design!

Ok so here are the things you are going to need:
  1.   Metal Dress Mannequin  
  2.  1 roll of Salmon Chevron 20" Designer Netting 
  3.  40 - 28" Orange Polka Dot Gerber Daisy 
  4.  7 - 28" Yellow Polka Dot Gerber Daisy
  5. 1- 32" Yellow Pine Feather Spray  
  6.  1 roll of  Diamond Dream Yellow Orange 2.5" X 15 Yds Ribbon


First you want to take all of your orange daisy's and place them in the top down to the waist line until the top of the mannequin is full. 
This is really very simple.  Robin didn't use anything to secure them, she just weaved them in the mannequin to secure them.  This is really easy to do because the stems are pretty flexible.  Do this until the top of your mannequin looks full.


Next I would suggest doing the skirt with the Salmon Chevron Designer Netting.  This way you can cover up where you have secured it with your yellow daisy's.  Ok so you are going to want to start by cutting about 20" strips of the Designer netting.  Cut enough of these that you can cover all the way around the mannequin.  Robin cut about 7 strips in the picture above.  Well that was easy enough!  Lets start securing them.  Now, Robin secured her Designer Netting by just weaving it in the mannequin.  I would suggest using zip ties to secure it. This is just as easy as cutting your strips of Designer Netting. You're going to secure these at the waist. Take the end of a strip of your netting and a zip tie and secure it to the metal around the waist.   As you're doing this all the way around the mannequin try to make sure you are securing it at the same place you started on your first strip you secured.  You don't want your skirt being different lengths.


Take your yellow daisy's and make your belt.  You are going to place these just like you did the orange.  Just make sure it is around the waist.  


Take your one yellow pine feather spray and secure it in the metal of the mannequin or you can zip tie it on the left side of the mannequin.  Let your spray hang down on the left side. This is just a piece to give your mannequin a little more pizzaz. 


The last thing you want to do is cut 5 16" strips of Diamond Dream Ribbon. Secure each strip on the waist with a zip tie or just weave it in.  Space the ribbon out evenly around the skirt and let drape over the Salmon Designer Netting.   Then cut two small strips about 12" long and secure them on the shoulders of the mannequin.  Be sure to secure in the middle so that you have the two ends of the ribbon sticking out on the top of each shoulder.  Then your done!  See it wasn't as hard as it looked!  

If you would like to show us your dress, you can email us at tiffoni.tmigifts@gmail.com
If you need more detailed instructions call 1-800-869-3395 and ask for Tiffoni or Robin.