TMI Gifts Logo

TMI Gifts Logo

Wednesday, February 26, 2014

How to Decorate a Grapevine Wreath


Grapevine Wreath Decor

Grapevine wreaths (also called twig wreaths) are very popular right now.  I love the fact that it’s simple and still gorgeous.  Some people don’t like big blingy wreaths on their doors so here is a suggestion for those of you who like a simpler look. Robin has designed a Grapevine wreath using our florals and ribbons. Each picture is linked to the website.  Note:  You will have left over product. 


First you will start out with a 24” Grapevine wreath. 
You can also use an 18" if you think the 24" is too big for your door.
We have several different sizes in this wreath

  
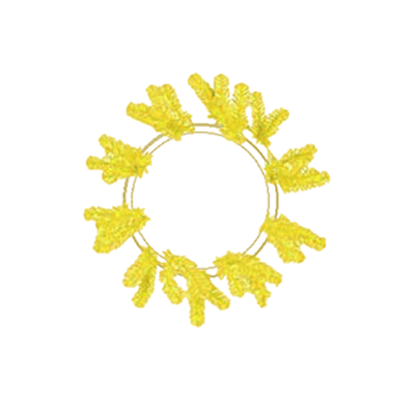
You will start with this 36" yellow dry mix bundle spray.  This spray also comes in blue and red.  Leave the dry mix bundle spray together, and the secure it by zip tying it together.  (Some people also use pipe cleaners to secure) 
You then take the bundle and zip tie it onto one side of  your grapevine wreath.  It is very simple.  You can see in the video that there isn't much to it.  Robin secures the bundle by putting the zip tie through part of it and part of the wreath. By doing it this way you can't see the zip tie.  To make sure it stay in place she also turns the wreath around a secures it on the back. After you have done these steps it is then ok to take the tape off the bundle since it is secured.

http://shop.tmigifts.com/dry-mix-bundle-yellow-36-15323/dp/5957

Robin takes half the bundle and flips it the other way.  She does this so that you have curls of each end of the spray.  After this step, secure the bundle together with of course a zip tie. Then take another zip tie and slide it behind the one you just secured your spray with.  This will allow you to secure the spray to the yellow bundle you just placed on the wreath.  You can see in the video that Robin secures her spray at an angle but beside the yellow bundle spray.


 You will also need florals. Robin uses a 1 - yellow sunflower, 1 - pink spider daisy and 1 - orange spider daisy.  You can change up the colors to whatever fits you best.  The Spider Daisy also comes in purple and yellow.  She takes the stem at the top close the the flowers and bends it so that you will be able to see the flowers after it is attached to the wreath.

http://shop.tmigifts.com/spider-gerbera-daisy-30-stem-6-bloom-4-colors-priced-per-each-023784ast/dp/6324http://shop.tmigifts.com/floral-sunflower-stem-orange-55-bloom-12202sun/dp/3409 

 2 -Robin uses the 32" Yellow pine spray (also in pink) to place right behind her spider daisy and sunflower. It is real easy.  You just bunch these together in the way you like them and place the yellow pine behind it to give it color and a different look. She then takes the other yellow pine and and flips in opposite of the flowers so that you have color on the bottom as well.  Secure this bundle of flowers and sprays with what? You have to know the answer to this by now.  A handy zip tie. Take another zip ties and secure it contrasting to the other bundles and sprays.


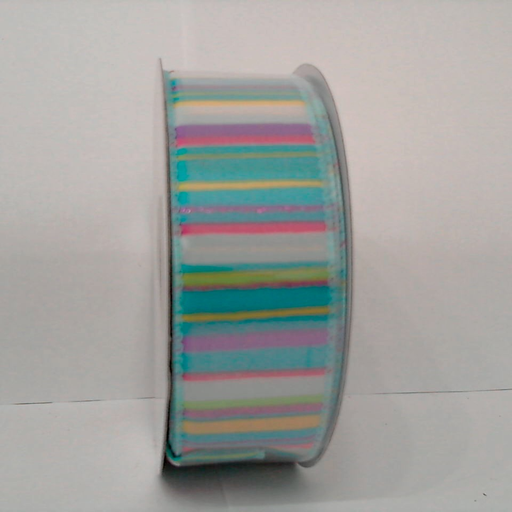
We are nearly finished!  To bring everything together you want to top it off with a bow.  Robin has used our 6" Bunny Designer Netting with 20 Yards.  Now most people get completely beside themselves when even thinking about trying to make a bow. Don't stress out over it.  It isn't hard with Designer Netting.  It is as simple as making a few loops.  As you can see in the video, Robin takes the 6" Bunny Designer Netting and loops it from side to side while holding the middle tight.  She give each side 3 loops and leaves a little bit of a streamer.  After cutting the ribbon from making her bow she then adds extra streamers by cutting a strip and placing holding it in the middle of the bow.  

 Robin then adds our 3" Limeade Designer with 20 Yards netting to layer on top of the Bunny ribbon.  As you keep a hold of the grip you have of the bow made with the bunny ribbon, you add the limeade in with it by making two loops to each side. Zip tie the bow where you have your grip. Before you pull the zip tie too tight slip another zip tie to that zip tie so that you can easily secure it to the wreath.  After you have got that zip tie in there, then you can pull tight. Then take the zip tie you slid in the other on the bow and secure the bow to the sprays.  The bow is great because it covers up all the other zip ties you have used on the sprays.  

For an added embellishment, Robin adds a metal peacock onto the wreath.
She places it more towards the bottom middle to the wreath and secures it with a wire. You can also use a zip tie for this.  If you don't like peacocks you can always try a different embellishment. We have so many you can choose from on our website at www.tmigifts.com

And this is your finished product 


How to Decorate a Grapevine Wreath


Monday, February 17, 2014

How to Design a Tag Wreath

Designing new and unique items is something we love to do here at TMI Gifts.  We have two incredibly great Designers with us now.  What we want to show you today is how to make a tag wreath. Brittany does a great job of showing how great your scrap ribbons can be.  In this particular video Brittany uses new rolls of ribbon but she has created a tag wreath made out of left over ribbons that she had laying around.   That is how she came up with this wreath look. 
First you need a 1- 24" Yellow Work Wreath (Of course you can always change up the wreath color because it isn't that noticeable after all the ribbon is put on it)

http://shop.tmigifts.com/wreaths-24-work
4 rolls of 4" x 10 Yard Jute Ribbon 
Yellow Jute
Lavender Jute
Sea-foam Jute
Hot Pink Jute

http://shop.tmigifts.com/searchresults/pg?q=netting%20jute
Cut these into 8" to 12" strips.  It does not have to be precise. 
The next step is pretty simple.  All you do is take the strips you have cut
and place them in between two branches and twist the branches together
to secure the ribbon. Attach a second piece of ribbon on top of the one
you just did. After attaching each piece it should look a lot like this.
https://www.youtube.com/watch?v=kMCp2ikL57o
(This is not the exact wreath in the video being made)

In this video Brittany has mixed the colors together to create a more spring look but you can also do all solids.  Just be sure to give each branch two strips of ribbon so that it creates a full look. 
1 roll of 4"  x 10 Yard Wire Ribbon. Pink is shown used in the video.
Leave ever how much ribbon you want hanging down from your bow. Brittany leaves about 12".  The start looping from side to side.  Here there is 3 loops on each side.  You can make a larger bow by larger and more loops. Hold that and start with your printed ribbon.
http://shop.tmigifts.com/searchresults/pg?q=netting%20wire%20ribbon
1 roll of 1.5" Printed Ribbon is used to make a bow. This is not the exact one shown in the video but close to the colors. Note: Click on any of the pictures to take you to the product shown.
 Loop this ribbon just like you did with the wire ribbon but do it on top of your wire ribbon. In the video Brittany also did three loops on each side.  Now, most people just zip tie the bow together.  As Brittany is holding the bow she loops some ribbon snug around her thumb before cutting the ribbon.  She then zip ties her bow and places the tie where her thumb was so that the zip tie isn't visible.  You don't have to do this step but it is an option.  If you don't want to do that just skip that step and zip tie where you were holding your bow. 
http://shop.tmigifts.com/ribbon-1-1-2-ribbon-number-9
The last step is securing the bow to the wreath.  You can either zip tie the bow to the wreath or you and use the wreath branched to secure it in.


So that is how you make a tag wreath!  Watch this video to get a better understanding of how Brittany used each item.


Wednesday, February 12, 2014


     Nearly two months into 2014 and we have been extremely busy here at TMI Gifts!  As soon as we came back from Christmas vacation we hit the road! It seems like we are always on the road.  We traveled to Atlanta for The International Gift and Home Furnishings Market.  This market is always a busy one for us!  We not only set up for market but we also search for new ideas for our customers.  We find so many unique and inspiring ideas from all kinds of different showrooms.  It’s a very informative show for sure. 

    Right after the Atlanta show we had about a week and then hit the road for Biloxi.  The Biloxi Gift Show is always a great one for us.  This year the weather definitely had an effect on the show.   I am not sure us Mississippians knew how to drive is such weather.   As we traveled back from the show we ran into iced over roads and snow.  It was definitely a different experience for myself considering I had never been in anything like it.  I was clinching my seat and looking over to my left at Robin saying “I am scared Rob, I am really scared.” Not too long after the words left my mouth, we witnessed a car sliding off the road into a ditch.  He was ok but it was scary for sure.  I couldn’t imagine us sliding off the road in our bob truck!  Thank goodness we made it back safely.  And just in time to repack our trucks and hit the road to our next show.  Who knows, it might be quite the adventure to the Louisville Ky Gift Show too. 

Wednesday, February 5, 2014

Spring Preview


  We are stocked up on new Spring, Easter, Valentine's, Mardi Gras, Florals, Ribbons and much more!  We have great prices on our new product.  We have a large variety of owls, butterflies, flowers, picks, and gift items.  Be sure to come see us and stock up!

Monday, August 12, 2013

It's (almost) Fall Yall!

It's Fall Yall!

As we sweat through the final weeks of summer heat, most of us are ready to welcome the cooler weather and all that the fall season brings. Nature puts on a beautiful show for the fall season and that beauty has inspired all kinds of decorations and home decor in that same gorgeous fall palette. Seems to me everyone is so eager to start decorating for the fall season and for halloween. Maybe it is our way to welcome one of everyone's favorite seasons, or we're just tired of not having a season to decorate for? Either way it's a great time to get festive and decorate for your home or business.

Your front door is the first impression people have of your home as they enter. You want it to send a welcoming message and there are so many options to spruce it up! Here are two options for your front door:

The first is a floral swag, made simply by combining different floral stems and finishing it off with some beautiful ribbons in multiple colors!
 This wooden pumpkin has a metal hanger and would look great alone or fixed up with a bow for a welcoming door hanger.
And of course a wreath is always a great option for your front door! This wreath was made with one of our 24" work wreath forms and a burlap coffee bag cut into strips. Perfect for fall!
 

When it comes to decorating, we can't let the door get all the credit. The inside of your home can be beautifully decorated for fall by adding a few simple pieces here and there. Your guests will be impressed that you did something a little extra this year, whether they are there for thanksgiving or a football game! We have several great pieces for fall, as well as burlap table covers and runners that could be incorporated into your fall decorations.


Last, but certainly not least is your table. This is one of the few times that some families gather around a table and have a meal together. The table deserves its place and something beautiful to adorn it. This can be as simple as some fabric with a few sitters placed here and there or as fancy as you'd like to make it. Here is an example of a fall arrangement done here at TMI that would make a great accent to any fall table.


 Like the rest of us, you've probably made it through the summer months without much decorating but now is the time to embrace the fall season and bring that beauty into your home. So why not .. it's fall yall! :)

All of the products can be found on our website 
www.tmigifts.com or in our showroom.
Give us a call at 1-800-869-3395

Friday, June 28, 2013

News


This year has started off to be a busy one for us but we can’t complain.  So far this year we have exhibited at the Atlanta International Gift & Home Furnishings Market, Biloxi Gift Show, ASD Las Vegas Show, and Mississippi Market in Jackson.  Our busiest time of the year is about to hit us as we get ready and prepare to set up our Christmas Showroom.  We are very excited to announce that this year we are completely redesigning a whole new look to our showroom.  Our designers have designed a unique and inspiring look this year and we hope you all love it!! We are very excited about some of the changes we have made.  Not just that but we have several more shows coming up.  We go to the Atlanta International Gift & Home Furnishings Market, Biloxi Gift Show, ASD Las Vegas Show, Smoky Mountain Gift Show, Celebration Village, Tupelo Furniture Market, Arkansas Floral Association, Norton’s Gift Show, and our open house in September.   Be sure to come see us at these events and see our newest product and designs!

Mississippi Market 2013


Wednesday, June 19, 2013

Biloxi Gift Show


Be sure to come visit us at our next show.

Biloxi Gift Show


     The Biloxi, Mississippi Wholesale Gift Show will be held August 3-5, 2013 at the Mississippi Gulf Coast Coliseum and Convention Center. There is over 300 booths with manufacturers from 22 states.  We offer a huge selection of decor, housewares, ribbon, designer netting and gift items.  We will be displaying our NEW chevron burlap 20" netting. Be sure visit us at booth number 237 and see our show specials!
Show Location: The Biloxi, Mississippi Wholesale Gift Show is held at the Mississippi Gulf Coast Coliseum and Convention Center.
Show Hours: 9-5 Saturday & Sunday, 9-2 on Monday